How to Convert a 2D Image to a 3D Model
Turn one object image into a 3D model, choose output settings, and review the mesh before using it.
Turn an object image into a 3D model you can review. Paste this into your agent:
Set up https://monid.ai/SKILL.md, then help me turn a 2D image of one object into a 3D model, inspect the available settings and price, and save the output for review.
One prompt starts the workflow.
Designers and developers searching for a 2d image to 3d model often start with a single product photo or concept drawing. That one image shows only one view, while a usable model needs a surface all the way around the object.
Building that surface by hand gives you control, but it also asks you to make decisions about the hidden side before you can review the object from another angle. A flat image on its own does not contain a complete mesh, a set of polygons that defines a 3D surface.
This guide shows how to prepare one image, request a model through Monid, and review the resulting files. Monid is a tool layer for agents: one key and one balance give an agent access to tools from multiple providers. The generation tool covers creating the model files; it does not verify dimensions, correct the unseen surfaces, or approve the asset for your project.
The inspected tool declares model_urls, texture_urls, and thumbnail_url as output fields. These are the documented response fields, not a generated example or a quality guarantee. You will decide whether the asset is usable after opening it in your own 3D software.
What is a 2D image to 3D model conversion?
Conversion creates a 3D object from an image by generating geometry and, when requested, textures. The input provides visible visual cues; the generator must infer information the image does not show.
Geometry and texture serve different jobs
Geometry describes the shape of the object in space. A mesh is made of connected polygons, and its topology describes how those polygons connect. A texture supplies surface appearance, such as color or material detail, rather than changing the underlying silhouette.
Think of a photographed ceramic cup. The generator can use its visible outline and surface as reference, but the picture does not establish the exact shape of its hidden handle attachment, the base, or the interior. Rotate the resulting mesh and compare those areas with your reference before using it.
A generated asset is a starting point
Choose a 3D model when your next step needs rotation, editing, or an object in a scene. Choose a finished image when the deliverable is a fixed picture and the hidden geometry is irrelevant. The comparison of product images and 3D models explains that distinction in the context of product imagery.
A generated shape is not a dimensional survey. If a manufacturing drawing or a client specification requires precise measurements, supply those measurements separately and check them in the modeling software. The reference image remains useful for appearance, but it cannot certify the unseen parts.
How do you prepare an image for conversion?
Use an accessible image of one clearly visible object, then decide what the model must do before choosing settings. The generation input accepts a public HTTPS image URL for one object.
Step 1. Choose one subject
Start with the object you want to inspect or place in a scene. A single subject gives you a clear criterion for reviewing the result: compare the model's silhouette, major features, and surface with that reference. A scene with several objects creates an extra choice about which object is the intended subject.
Pick a reference you have permission to use, and avoid exposing private material through a public link. A public URL is accessible to the service fetching it, so choose a file you are comfortable making accessible. The schema requires a URL rather than a local path.
Step 2. Define the destination
Write down the receiving application, required file format, and whether the asset needs texture. A browser preview, a game scene, and a physical prototype impose different requirements. A file extension alone does not establish that a model will be suitable for any of them.
For example, if a scene editor accepts GLB, request GLB and open it there after generation. If your next step is a physical print, review the shape and export requirements in the print workflow. Check scale, surface integrity, and details before treating the file as a finished deliverable.
Step 3. Keep the reference available
Keep the source image and a short description of the intended use beside the project. Store the original URL and the settings you choose with the asset record, so a reviewer can understand what the model was meant to represent. Record any manual edits separately from the generated starting point.
If you need an image first, the guide to choosing an image generator covers that separate image creation task. Review the image before feeding it into a 3D workflow: a generator cannot turn an unclear creative brief into a specification for hidden geometry.
How to convert an image to a 3D model
Use Monid to discover and inspect the Meshy image-to-3D tool, select settings, then submit one object image. An endpoint is a named tool operation that accepts specified inputs and returns a response.
Step 1. Set up access
For an agent, get a key at app.monid.ai and give the agent the setup instruction below. The agent can discover and inspect the tool before requesting a paid generation.
set up https://monid.ai/SKILL.md
For a human using the command line, install the CLI and add the key:
npm install -g @monid-ai/cli
monid keys add -k <your-api-key> -l main
The agent quickstart and CLI quickstart cover setup. Keep your key out of shared prompts, source files, and screenshots.
Step 2. Inspect the tool and choose settings
Search for the job and inspect the exact Meshy image-to-3D tool. Discovery and inspection are free; generation is the paid step.
monid discover -q "2d image to 3d model"
monid inspect -p meshy -e /image-to-3d/generate
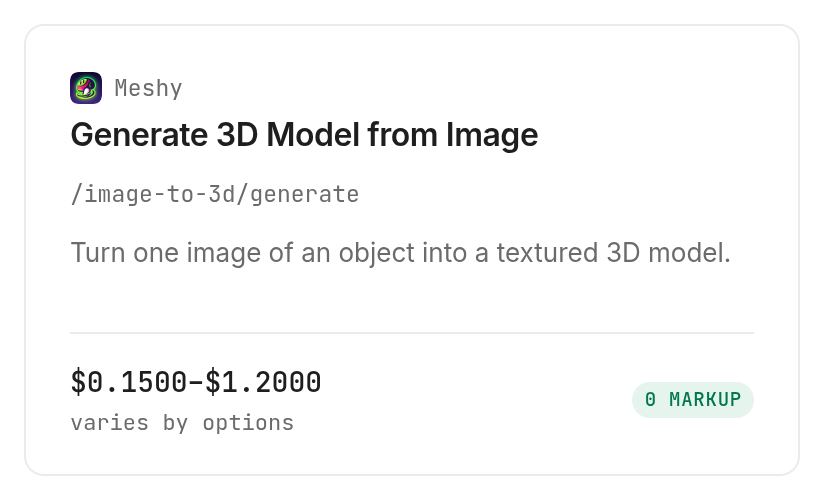
The tool card shows a matrix range of $0.15 to $1.20 per call, Verified 2026-11-22. The input schema requires image_url. It also accepts ai_model, should_texture, texture_resolution, geometry_resolution, topology, target_polycount, and target_formats. The available options matter because the model and texture selections affect the price and the file you plan to review.
Step 3. Supply the image and request the model
Give the agent the public image URL and the format you need. Ask it to inspect the current price for the exact settings and show you the selections before submitting. For a first pass, use one image and one output format; that keeps the review focused on a single object.
The following command illustrates the schema with an example URL. Replace it with your own public HTTPS image URL. -w waits for the operation; the example chooses the mesh-only lite configuration and GLB output.
monid run -p meshy -e /image-to-3d/generate -w -i '{"image_url":"https://example.com/object.png","ai_model":"meshy-6-lite","should_texture":false,"geometry_resolution":"standard","texture_resolution":"2k","target_formats":["glb"]}'
The declared matrix price for these selections is $0.15 per call, Verified 2026-11-22. The example URL is a placeholder, not a submitted image or a sample result. Do not use it as evidence that a model was produced.
Step 4. Save and review the files
When the run completes, inspect its response and download the model files you need. The tool documentation says the download links are signed and the provider deletes the files after three days, so save the files to your own project storage rather than treating a returned URL as an archive.
If you receive a run ID instead of waiting inline, use monid runs get -r <run-id> -o model-result.json to retrieve the run record. Save the source reference, settings, and final chosen files together. A run record identifies a request; the downloaded model is the asset you actually review.
How do you inspect and use the model?
Open the model in the application where it will be used, rotate it, and compare it with the reference and the project requirements. Monid provides the generation step, while your review determines whether the asset fits the job.
Read the declared response fields
The inspected tool describes the following output fields. This is a schema guide, not a table of results from a generation.
| Field | What the tool declares |
|---|---|
model_urls | Links to model files, including requested formats. |
texture_urls | Links to texture maps, including base color, metallic, roughness and normal. |
thumbnail_url | A link to a thumbnail preview. |
The schema lists GLB, OBJ, FBX, STL, USDZ, and 3MF as format options. Request the format your destination accepts instead of assuming every application handles every file in the same way. Texture maps are relevant to a textured request; a mesh-only request does not supply a finished textured appearance.
Check the silhouette and hidden surfaces
Start with the view closest to the reference, then turn the object to examine its sides, back, top, and bottom. Compare the major proportions and recognizable details with the image. Mark each area that needs correction rather than judging the model only from the thumbnail.
Next, check the surface at the scale at which the asset will appear. Small surface details matter more in a close-up than in a distant scene. For a physical object, compare against measurements or additional references; the single image does not prove the dimensions or the geometry on the far side.
Check topology and the destination
Open the requested file in your target application and inspect how its geometry and materials load. If you need to edit or animate the object, look at topology as well as appearance. The tool exposes triangle and quad topology options and a target polygon count; those are requests to the generator, not guarantees that a particular downstream workflow will accept the result.
Whichever generation route you choose, keep an editable copy before applying project-specific changes, and review the final asset again after those edits.
How much does converting an image to a 3D model cost?
The inspected generation tool uses a price matrix based on model, texture, texture resolution, and geometry resolution. Monid discovery and inspection are free, and a generation request is priced according to its settings.
Compare the exact settings
For meshy-6-lite, no texture, 2k texture resolution, and standard geometry, the listed price is $0.15 per call, Verified 2026-11-22. With the same model and geometry but texture enabled at 2k, the listed price is $0.45 per call, Verified 2026-11-22. Those are two matrix entries, not a promise that all texture or geometry combinations use the same price.
The inspected defaults are latest, texture enabled, 2k texture resolution, and standard geometry. That combination is listed at $0.90 per call, Verified 2026-11-22. Changing the model, raising geometry or texture resolution, or selecting a separate texture model changes the pricing calculation; inspect the current Meshy tool listing for the full matrix before submitting.
Budget for review as well as generation
A first model is a candidate for review. Allow for the time needed to open it, compare it with the reference, and edit or replace features that do not meet your needs. If you decide to submit another generation with different inputs, that is another request with its own price.
The inspected pricing notes state that if the provider charges more credits than its price table, the run bills what the provider charged. Failure and empty-result billing are not established by this inspection, so do not assume a failed request is free. Review the displayed terms and request settings before authorizing a run.
When should you use another approach?
Use a manual modeling workflow when exact dimensions, controlled topology, or a deliberately designed unseen side are essential. This is the Monid blog, and Monid provides access to the Meshy generation tool described here; the result still needs human review.
Use manual modeling for specified geometry
A modeler working from drawings, measurements, and multiple references can build to a defined specification. That work is appropriate when a client needs a particular back surface or a production asset must conform to a measured object. A single image generation request cannot establish those facts.
Use Meshy directly when its workspace fits your process
Meshy is the provider of the generation operation. Its own interface is a direct route for a person who wants to work in that environment. Monid is useful when an agent or script needs the tool alongside other tools under one key and balance; choose the interface that fits how your team reviews and stores assets.
Which tool fits this job?
The 3D generation tools cover different workflows; this guide uses one inspected operation for one object image. Select the tool by input and desired output, then review the exact settings.
| Use case | Best endpoint | Why? |
|---|---|---|
| One object image to mesh | Meshy /image-to-3d/generate | Accepts one public image URL and format selections; mesh-only lite example $0.15 per call, Verified 2026-11-22. |
| One object image with texture | Meshy /image-to-3d/generate | Texture can be enabled; lite with 2k texture and standard geometry $0.45 per call, Verified 2026-11-22. |
These rows describe settings for the same operation. They do not establish quality, file contents, or completion time for a particular image.
Conclusion
You now have a repeatable route from a single object image to a model request: prepare the reference, inspect the settings and price, save the returned files, and review the geometry in your destination application. Monid handles access to the generation tool, while your review supplies the decision about whether the model meets the brief. The result is a clear process for moving from a flat reference to an asset you can assess and improve.
FAQ
How do you turn an image into a 3D model?
Choose an image of one object, provide its public HTTPS URL to an image-to-3D generation tool, and review the returned model in your target application. The hidden surfaces require particular attention because a single view does not show them.
Is there a free image to 3D model workflow?
Discovery and inspection on Monid are free; the Meshy generation operation has a price based on the selected settings. The tool listing shows the current matrix before you submit a request.
Do I need to write code to convert an image to a 3D model?
No. An agent can follow the setup prompt, inspect the tool and submit a request using the image URL and settings you provide. You still need to review the generated files in an appropriate 3D application.
Can converting an image to a 3D model recover exact dimensions?
A single image does not establish exact dimensions. Supply measurements and check the geometry separately when the model needs to meet a dimensional specification.
Which file format should I choose?
Choose a format accepted by the application that will open the model. The inspected tool lists GLB, OBJ, FBX, STL, USDZ, and 3MF as selectable formats; verify the asset in its destination after download.
What happens if generation fails?
Failure billing is not specified by the inspected schema. Read the current terms and keep the run record so you can identify the request if you need help.
Can I use any image for a model?
Use an image you have permission to submit and share through a public URL. Rules differ by location, so check the rights and requirements that apply to your use.
Published November 2026.